
Author: Pam Beeman (Page 3 of 3)

Monitor Mount Ergonomics in the Workplace

Monitor Mount Ergonomics

Ergonomics is more than a buzzword. It has taken a major role in our workplaces and homes to help keep us healthier and happier. Ergonomics is an applied science concerned with designing and arranging things people use so that the people and things interact most efficiently and safely. In an office setting the ergonomics of the workspace is paramount. The placement of the chair, desk, keyboard, and mouse all come into play when creating an ergonomically precise work environment. However, the monitor mount ergonomics and the placement of the computer monitor is especially important.

When it comes to optimal ergonomic screen placement OSHA has some great insight. They focus on four main improvements that can be made to benefit the ergonomics of a monitor in a workspace:

1. Viewing Distance
>Sit at a comfortable distance from the monitor where you can easily read all text with your head and torso in an upright posture and your back supported by your chair. Generally, the preferred viewing distance is between 20 and 40 inches (50 and 100 cm) from the eye to the front surface of the computer screen. NOTE: text size may need to be increased for smaller monitors.

2. Viewing Angle-Height and Side to Side
>Position your computer monitor directly in front of you, so your head, neck, and torso face forward when viewing the screen. Monitors should not be farther than 35 degrees to the left or right.
>If you work primarily from printed material, place the monitor slightly to the side and keep the printed material directly in front. Keep printed materials and monitors as close as possible to each other.
>The top of the monitor should be at or slightly below eye level. The center of the computer monitor should normally be located 15 to 20 degrees below horizontal eye level

3. Viewing Time
>Rest your eyes periodically by focusing on objects that are farther away (for example, a clock on a wall  20 feet away).
>Stop, look away and blink at regular intervals to moisten the eyes.
>Alternate duties with other non-computer tasks such as filing, phone work, or customer interaction to provide periods of rest for the eyes.

4. Viewing Clarity

>Tilt the monitor so it is perpendicular to your line of sight, usually by tilting the screen no more than 10 to 20 degrees.

>Monitor support surfaces should allow the user to modify viewing distances and tilt and rotation angles.
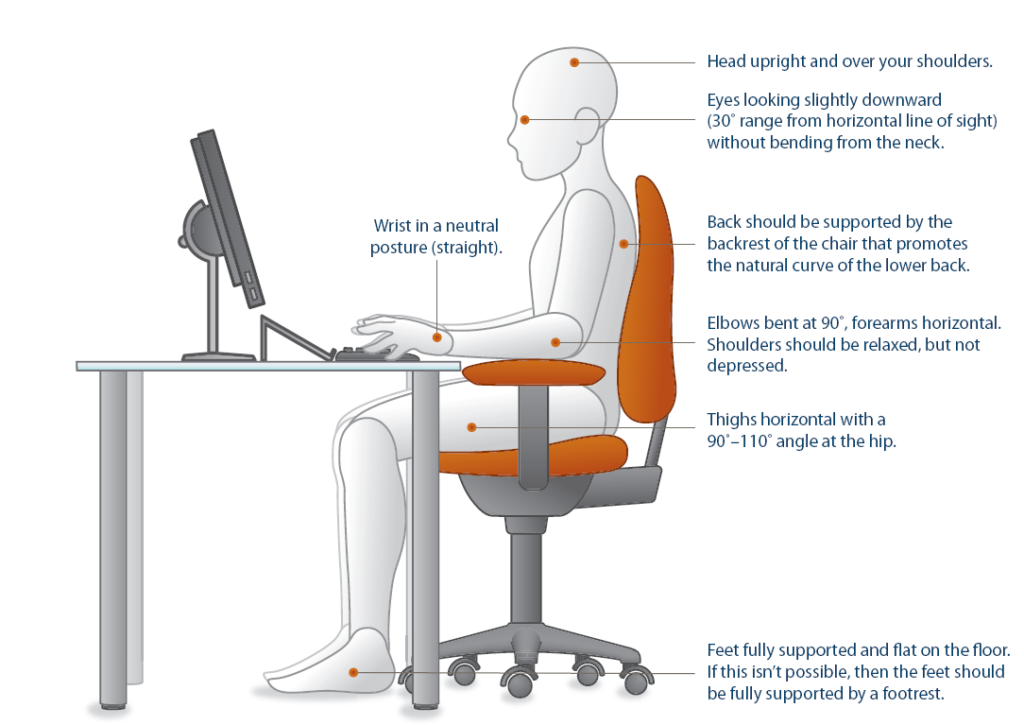
Monitor Mount Ergonomics

Making these adjustments helps reduce exposure to forceful exertions, awkward postures, and overhead glare. This also helps prevent possible health effects such as excessive fatigue, eye strain, and neck and back pain.

Here at MountMyMonitor.com we strive to help you create the healthiest work environment possible, offering only the best monitor mounts designed with monitor mount ergonomics in mind. We have a huge selection of mounts that can put your computer screen virtually anywhere! The majority of our monitor mounts are height and depth adjustable and have a large tilt range. Making them easy for multiple users to adjust them to their optimal ergonomic position. We also offer mounts that can be displayed in either portrait or landscape monitor orientations and can support multiple monitors.

Ergonomics is important for your health. We are here to help you find the perfect mount for your needs. Visit our website at www.MountMyMonitor.com or contact us today to upgrade your computing environment! Did you find this article helpful? Please leave us your comments, we would love to hear from you!

VESA – The Mounting Interface Standard

As consumers, we don’t like to get bogged down by the technical jargon of our purchases. However, every now and then a term pops up that is crucial for us to understand. In the world of mounts, that term is VESA.

What is VESA

What exactly does VESA mean? Why is it so important to you, the consumer? In our fast paced world of advancing technology and ever slimming, increasingly lightweight monitor screens, there has been a growing desire to mount these screens to walls, ceilings, desks and more! To meet that need mount manufacturers began working in tandem with monitor manufacturers. Monitor Manufactures agreed to follow standards created by the Video Electronic Standards Association (VESA for short) to create holes in the back of our flat panel displays. These holes  line up with holes in the mounts we purchase that are universal and easy for us, as consumers, to use. It’s important to understand that although VESA is widely recognized it is NOT law.

How does it work

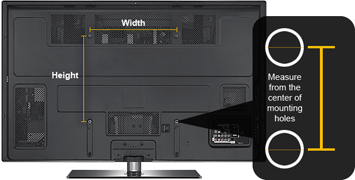
Now that you know what VESA means maybe you’d like to know how it works? Our store clearly lists the VESA compatibility dimensions that our mounts adhere to. For example, you might be looking at purchasing a wall mount for your home office computer monitor. You browse our store and find just the right one, the Systema Wall Mount. In the description of the product, you notice the bullet point, VESA Compatible: 75×75 and 100×100. You now know what VESA means but what about those numbers? Those numbers represent the space between the holes, measured in millimeters, on the back of your monitor. For an accurate fit, before you hit that “buy” button, make sure you measure those holes (or VESA pattern) on the back of your flat screen. Some things to remember when measuring are:

  • Measure from the center of the holes
  • Measure from the furthest 4 corners holes (if there are more than 4 holes)
  • Be aware of any curve on the back of the monitor that would affect mounting
  • Take both horizontal and vertical measurements

vesa2

Measuring can be tricky for those of us that favor centimeters over millimeters so this “cheat-sheet” might be of some help:

vesa3

In our above example of the Systema Wall Mount, the VESA patterns measurements were 75×75 AND 100×100. This tells us that the mount has holes to fit a monitor with a VESA pattern of both 75 millimeters by 75 millimeters and 100 millimeters by 100 millimeters. It’s that simple! The measurement of the VESA pattern, along with the size and weight of your monitor, is all you need to confidently purchase the perfectly fitted mount for your needs.

For the MAC users

VESA is widely recognized but is NOT law, as mentioned before.  Apple products do not offer VESA hole patterns on their monitors and iMacs. Furthermore, the native stand that comes with Apple products cannot be removed, therefore it is not VESA compatible after purchase. You can add an after-market VESA adapter to your apple display, but this adds an additional cost to the mount you’re looking for, and in many cases limits the mounting options. If you are considering a mount for a mac you are going to purchase, be sure to purchase the mac WITH A VESA ADAPTER (yes, Apple will sell you a VESA adapter for an additional cost instead of the native stand that it usually comes with) which will make the mac compatible with almost all of the mount we sell.

Still confused

We would love to help you! Please feel free to take advantage of our mount experts available by LiveChat on our Website or give us a call and we can assist you in finding the right mount for your needs! Did you find this article helpful? Leave us some feedback.

Newer posts »